Thursday, July 29, 2010

Basic Marinara Sauce


I really must get a better picture of this sauce next time. The battery on my camera was quickly dying and I had two hungry kids tugging at me as soon as I got this off the stove.

Anyway, don't let the less than stellar picture fool you...this is a great basic marinara sauce. It is so versatile and I use it on all sorts of things; to top pasta, on pizza, as a dipping sauce, etc.

This recipe makes about 6.5 cups of sauce, which is a lot but it freezes beautifully. Just make sure to cool the sauce in the refrigerator first. Then once cool, transfer to heavy duty freezer bags and label. You could also easily half this recipe if you like.

One last tip: Be careful of the splattering sauce! Leave a lid on the pot but slightly ajar to allow steam to escape. Otherwise you'll end up with blobs of sauce all over the counter!


INGREDIENTS
2 28 oz. cans (good quatliy) crushed tomatoes
1 medium onion, chopped
2-3 cloves garlic, minced
3 Tbsp olive oil
1 6 oz. can tomato paste
1 Tbsp dried basil
1/2 Tbsp dried oregano
2 medium bay leaves
1-2 tsp sugar
2 Tbsp balsamic vinegar

STEP 1: Cook onion and garlic in a large pot with 3 Tbsp of olive oil until very soft and slightly golden brown. I wanted to make a sweeter sauce which is why I let the onions and garlic caramelize a bit. If you don't like sweet sauces, proceed to the next step before they get any color on them.

STEP 2: Add the rest of the ingredients (crushed tomatoes, tomato paste, basil, oregano, bay leaves, sugar and balsamic vinegar) to the pot. Simmer on medium/low for 45 minutes to an hour with lid partially on to prevent splattering.

STEP 3: Taste the sauce after a half hour or so and adjust spices and seasoning to your liking.

Source: Adapted from Budget Bytes

Tuesday, July 27, 2010

Chocolate Covered Potato Chips


Sunday night is the one night that my husband and I have to sit down and watch TV together. Luckily, it's the night with all of our favorite shows...True Blood, Entourage and now Mad Men.

Season four of this Emmy award winning show started last Sunday and we were both excited for the premiere. If you are not familiar with the show, it airs on AMC on Sundays at 10PM. It's set in the early 1960's and centers around the lead character, Don Draper, and his colleagues in a Manhattan advertising agency. The story lines are great and I love the characters, especially Betty Drapper (Don's estranged, Stepford-esq wife).

My Mad Men self...I thought about putting a cocktail in my hand but a donut is really more appropriate :)

My husband usually loves to snack on chips and salsa but I decided to make something a little different this time. I know the combo of potato chips and chocolate might sound a little bit odd but it totally works! The salty chips and the sweet chocolate complement each other very well.

I decided to use Utz chips because the company is featured in the storyline of season two. Of course, Ruffles or any other brand will work just as well.

I only made a handful of chips for us to snack on but you could cover at least half a bag of chips with the amount of chocolate listed below.

I sprinkled half with mini chocolate chips and the other half with coarse salt. If you use the salt, just remember to do a little bit because potato chips are of course already salted enough.

Ingredients:

1/2 cup semi-sweet chocolate chips
1/2 tsp vegetable shortening
Ruffled potato chips
2 Tbsp mini chocolate chips (optional)
1 tsp coarse salt (optional)

Directions:

1. In a small glass dish, combine chocolate chips and shortening.
2. Heat in a microwave oven on high 30 seconds to 1 minutes or until melted and smooth when stirred.
3. Brush chips, one at a time, with a thick layer of chocolate, coating one half to three quarters of each chip.
4. Place chips on parchment or wax paper-lined baking pan.
5. Lightly sprinkle salt on top or mini chocolate chips
6. Let stand at room temperature 15 minutes, then refrigerate for another 15 minutes or until set.

Source: Chef Mommy

Monday, July 26, 2010

Grilled Shrimp Caesar Salad


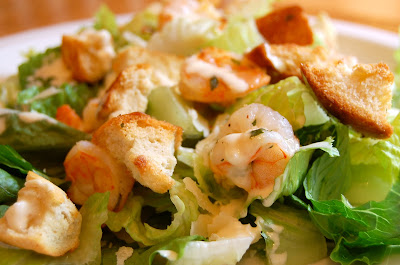
Per my husband's request, I made this light shrimp Caesar salad for dinner the other night and it was so good!

I used day old bagels (my friend had brought down from NJ) to make the croutons but any crusty bread works. The creamy Caesar dressing tasted so fresh and much better than any bottled dressing. The crisp romaine, tender shrimp, a little fresh grated Parmesan kept the meal light but still tasty. This made for a perfect summer time meal!

Though completely from scratch, it only takes about 25 minutes from start to finish.


Ingredients:

Croutons
1 1/2 cups, crusty bread cut into 3/4 inch cubes
1 Tbsp olive oil
1 tsp. dried parsley
1/2 tsp. garlic powder
1/4 tsp. salt

Dressing
1/4 cup mayonnaise
2 Tbsp olive oil
2 Tbsp fresh lemon juice
1/2 tsp Dijon mustard
1 garlic clove, finely minced
1/4 tsp Worcestershire sauce
1/4 tsp fresh cracked pepper

Shrimp
25-30 large shrimp, deviened
2 Tbsp olive oil
2 Tbsp fresh lemon juice
1 clove garlic, minced
1 Tbsp parsley, finely chopped
1/2 tsp salt
1/4 tsp pepper

Salad
5 cups chopped romaine lettuce
fresh saved Parmesan cheese to taste

Directions:

To make croutons:
Preheat oven to 350 degrees. In a gallon sized zip lock bag, combine all the ingredients and shake well to coat croutons. Spread croutons in a single layer on a baking sheet. Bake for 12-16 minutes, until golden crisp. Remove from oven and set aside.

To make Caesar dressing:
In a small bowl, combine all the ingredients and whisk well to combine.

To make shrimp:
In a gallon sized bag, add the shrimp and the rest of the marinade ingredients. Massage to combine and refrigerate for 10 minutes, but not longer than 15 minutes. Remove shrimp from marinade and grill or broil shrimp, about 1 1/2 minutes per side.

To make salad:
On a large plate or platter add lettuce. Then top with croutons, shrimp and shaved Parmesan. Drizzle desired amount of dressing over salad.

Source: Chef Mommy

Wednesday, July 21, 2010

Ham and Cheese Sliders


My son is crazy about these baked ham and cheese sliders. He asks me to make them almost every week!

I can't blame him though, they are very tasty...all warm, with gooey melted Swiss cheese and tasty ham. And even though I'm not a huge mustard fan (expect on a hotdog), I love it in these little sandwiches.

These make a great lunch or quick dinner. They are also perfect for casual parties. In fact, the original recipe makes 24 sliders (the version below only makes for 6 sliders).


Ingredients

Ham and Cheese Sliders
6 good white dinner rolls or slider rolls
12 thin slices honey ham
6 small slices Swiss cheese
6 Tbsp mayonnaise

Poppy seed sauce
1/2 tsp poppyseeds
1 tsp yellow mustard
1/4 stick butter, melted
1 tsp finely minced onion
1/4 tsp. Worcestershire sauce

Spread 1 Tbsp of mayonnaise onto both sides of the center of each roll. Place a 2 slices of ham and 1 slice of Swiss inside of each roll. Close rolls and place them into a large baking dish or heavy cookie sheet. Place very close together.

In a medium bowl, whisk together all of the poppy seed sauce ingredients. Pour evenly over all of the sandwiches. Let sit 10 minutes or until butter sets slightly. Cover with foil and bake at 350 degrees for 12-15 minutes or until cheese is melted. Uncover and cook for 2 additional minutes. Serve warm.

** sandwiches can be assembled a day ahead and kept in the fridge ready to bake.

Source: Adapted from The Girl Who Ate Everything

Monday, July 19, 2010

Doughnuts


This past Sunday I made raised yeast doughnuts. Yes, homemade, from scratch doughnuts...and they were as good as you would imagine.

I had been a little intimidated to try them up until now. However, I've been working more and more with yeast (and my deep fryer...but that's another story) and finally felt like I was ready to give these a try.


I used Pioneer Woman's recipe after reading several positive reviews and also because she always does step by step photos for her recipes. I know a lot of people are not fans of seeing so many pictures on food blogs, but I'm a visual learner and find it very helpful...especially when trying something for the first time.


I did have one problem with these. When I placed the doughnuts on the cookie sheet for their final rise, I didn't space them far enough apart.


As you can see by the picture above, when they puffed up they got stuck together. When I went to pull them apart, they deflated a bit and really made for a not so pretty doughnut :( Luckily, I still had another cookie sheet of doughnuts that were spaced a little further apart.


I ended up with 3 different doughnuts. The regular sized that I covered in the sugary glaze and sprinkles, these doughnut holes that I tossed in some cinnamon sugar...


and the pink "Diva" mini doughnuts that got hot pink glaze, sugar sprinkles and white nonpareils.


These tasted great but were a little dangerous to have around the house. So, I gave some to our neighbors and even sent the cable guy who was here to do some rewiring work with a doggy bag :)

Ingredients

Doughnuts
1-⅛ cup Whole Milk, Warm
¼ cups Sugar
2-¼ teaspoons (one Package) Instant Or Active Dry Yeast
2 whole Large Eggs, Beaten
1-¼ stick Unsalted Butter, melted
4 cups All-purpose Flour
¼ teaspoons Salt
Canola Oil

GLAZE
3 cups Powdered Sugar
½ teaspoons Salt
½ teaspoons Vanilla
½ cups Cold Water Or Milk

CINNAMON SUGAR
1/2 sugar
1 1/2 tsp cinnamon


Directions:

To Make the Dough:
1. Make sure milk is nice and warm, but not overly hot.
2. Add sugar to milk. Stir to dissolve.
3. Add yeast into a small bowl.
4. Pour milk/sugar mixture over yeast. Stir gently, then let sit for 10 minutes.
5. Melt butter in separate bowl until butter is almost melted. Stir to finish melting so butter won’t be overly hot.
6. Add beaten eggs to melted butter, stirring constantly to make sure the butter’s not too hot for the eggs.
7. Add the egg/butter mixture to the bowl of an electric mixer fitted with the dough hook.
8. With the mixer on 3 or medium-low speed, pour in the yeast mixture.
9. Allow the dough hook to stir this mixture for a couple of minutes, making sure it’s thoroughly combined.
10. With the mixer still going, add helpings of the flour mixture in 1/4 to 1/2 cup increments until all the flour is gone.
11. Stop the mixer, scrape the bowl, then turn the mixer on the same speed for five whole minutes.
12. After five minutes, stop the mixer and scrape the bottom of the bowl.
13. Turn on the mixer for 30 seconds.
14. Turn off the mixer and allow the dough to sit in the bowl undisturbed for 10 minutes.
15. After 10 minutes, transfer dough to a lightly oiled bowl. Toss the dough to coat, then cover the bowl with plastic wrap and place straight in the fridge.
16. Refrigerate dough for at least 8 hours, or overnight.

To Make the Doughnuts:
1. Remove bowl from fridge and turn out dough onto a lightly floured surface.
2. Roll out to 1/4 to 1/3-inch thickness.
3. Using a 3-inch cutter, cut as many rounds as you can, then roll out remaining dough and cut as much as you can, etc.
4. Cut holes out of each round using a 1 1/2-inch cutter.
5. Place both doughnuts and holes on a floured baking sheet.
6. Cover with large tea towel and place in a warm place in your kitchen; my kitchen is very drafty, so I have to briefly warm the griddle, then turn it off and set the sheets on top to keep warm.
7. Allow doughnuts to rise undisturbed for at least 1 hour; 1 hour 15 minutes if necessary. Doughuts should be visibly puffier and appear to be airy.

To Fry the Dougnuts:
1. Heat plenty of canola oil in a large pot until the temperature reaches 375 to 380 degrees—do not let it get hotter than 380 degrees! 375 is ideal; keep the thermometer in the pan to continually monitor.
2. One to two at a time, gently grab doughnuts and ease them into the hot oil. Allow them to cook 1 minute on each side; they will brown very quickly.
3. Remove doughnuts from the oil with a slotted spoon, allowing all oil to drip off.
4. Place doughnut immediately on several layers of paper towels. Count to five, then flip it over onto a clean part of the paper towels. Count to five, then flip it over again; the purpose, obviously, is to drain as much grease as possible before it soaks into the doughnut.
5. Repeat with remaining doughnuts and holes. The holes will cook more quickly than the doughnuts; about 30 seconds per side.
6. Allow doughnuts to slightly cool.

To Glaze:
1. Mix all glaze ingredients in a bowl until completely smooth.
2. One by one, dip doughnuts into the glaze until halfway submerged. (Note: completely submerge doughnut holes, then remove with slotted spoon.)
4. Remove from glaze, then turn right side up on a cooling rack over a cookie sheet (to catch dripping glaze.) Add sprinkles if desired.
5. Serve warm if possible, or room temperature.

To Make Cinnamon Sugar:
1. mix sugar and cinnamon together in a bowl.
2. Add doughnuts and toss to coat

Source: Pioneer Woman

Friday, July 16, 2010

It's My Blogiversary!!


Chef Mommy is officially one year old!

....it seems like only yesterday.... :-)

First and foremost, I would like to thank everyone who comes to visit my little blog. Thank you for taking the time to leave me a comment or send me an email. I really appreciate it and it makes maintaining this blog a lot of fun.

Last year at this time, I decided to start "Chef Mommy" (a nickname my husband and son gave me a while back). I did it just to start cataloging meals that I really liked and to get me out of a cooking rut. Well, mission accomplished! This blog has certainly helped me be more creative in the kitchen and a better cook overall. It's also introduced me to so many other wonderful blogs,new foods and helped me take better pictures.


Of course, I also have to thank my family for being my faithful test tasters and enduring hearing the following phrase countless times this past year:

"It's almost ready...I just need to take a picture of it first".

They are truly my inspiration for this blog.


Thank you again and now lets all go have a cupcake to celebrate!

Friday, July 9, 2010

Bang Bang Shrimp


Are you all familiar with Bonefish Grill? If not, it's a "moderately expensive" chain restaurant that specializing in seafood cooked over a wood-burning grill. We have one in our town center and it's always busy, especially on the weekends. Their most popular appetizer is this crispy and spicy Bang, Bang shrimp. I found a copycat recipe online and decided to give it a try at home.

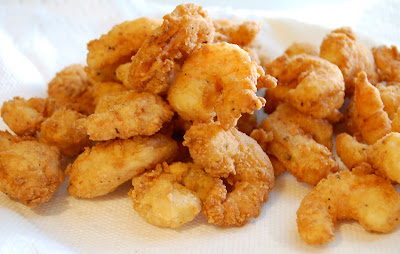
Success!! This recipe was very, very close to what we get at Bonefish. It starts off with shrimp that are coated with a seasoned flour-Panko breading, then fried till golden brown.


They are then tossed with the special "Bang Bang" sauce, a combo of mayo, chili garlic sauce and rice vinegar, that makes this appetizer addictively good!


I won't lie though, this is not a figure friendly meal (fried & mayo) but it's not like your going to be making this every day either...so, go ahead and enjoy! We sure did!! My husband thought this tasted very authentic and my son raved and raved about it! I actually served it to him with the sauce on the side, in case he thought it was too spicy, but the sauce was his favorite part...surprise :)

Our entire meal was actually Bonefish inspired. I also made these seared scallops with warm mango salsa over Jasmin rice...all the yum, but no big bill at the end!


Ingredients:

1 lb. medium shrimp, peeled and deveined

SPICY SAUCE:
1/2 cup mayonnaise
4-5 teaspoons chili garlic sauce, such as Sriracha sauce
1 teaspoon granulated sugar
1 teaspoon rice vinegar

FOR THE EGG MIXTURE:
1 egg, beaten
1 cup milk

FOR THE BREADING MIXTURE:
1/2 cup all-purpose flour
1/2 cup panko breadcrumbs
1 teaspoon salt
1/2 teaspoon ground black pepper
1/4 teaspoon onion powder
1/4 teaspoon garlic powder
1/4 teaspoon dried basil

FOR FRYING:
8 to 12 cups vegetable oil

GARNISH:
1 handful of shredded romaine lettuce
1 green onion, chopped (green part only)

Combine all ingredients for the spicy sauce in a small bowl; cover and set aside.

Combine beaten egg with milk in shallow bowl; set aside.

Combine flour, panko, salt, black pepper, onion powder, garlic powder, and basil in another shallow bowl; set aside.

Bread the shrimp by first coating each with the breading mixture. Dip breaded shrimp into the egg and milk mixture, and then back into the breading. Arrange the coated shrimp on a plate and pop them into the fridge for at least 20 minutes. This step will help the breading to stick on the shrimp when they are frying.

Heat oil in deep fryer to 350 degrees F. Use amount of oil required by your fryer.

When oil is hot, fry shrimp 2 to 3 minutes or until golden brown. Drain on rack or paper towels.

When all shrimp has been fried, drop the shrimp into a large bowl. Spoon about 1/4 cup of sauce over shrimp and stir gently to coat.

TO SERVE:
Stack shrimp on bed of mixed greens, sprinkle the stack with chopped green onion.

Serves 2 to 4 as appetizer

Source: Inspired by Bonefish Grill, recipe adapted from Secret Restaurant Recipes.

Monday, July 5, 2010

Hello Kitty Cupcakes


Last week, I got the chance to make these adorable Hello Kitty cupcakes for a little girl's third birthday party. Her mom and I are in the same MOMS Club and about a month ago she asked if I could do them. I was a little unsure initially because I am not an artisic person...you should see the pictures I draw for my kids (my 2 year old's almost look better). However, Hello Kitty, seemed simple enough. So I went home, got out some fondant and attempted to make a Hello Kitty. And I did! I called up the mom to let her know and she placed an order for 3 dozen cupcakes;chocolate, vanilla and strawberry.

The Kitty cupcake toppers were made out of a homemade marshmallow fondant (very simple...marshmallows, confectioners sugar and water). I added pink and yellow food color to make small batches of colored fondant. These were then used to make the bow and nose. The wiskers were drawn on with edible food color markers.


I made these three days in advance and kept them covered until the cupcakes were ready to be frosted (the day of). This gave them a chance to stiffen up a bit because homemade fondant is softer than the packaged varities.

The recipe for the chocolate cupcakes came from Martha Stewart.


The frosting was pink vanilla swiss meringue buttercream.


Chocolate, vanilla and strawberry cupcakes. The mom said they were a hit :-)


HAPPY BIRTHDAY CORA!!

Sunday, July 4, 2010

Flag Cake


These instructions are coming a bit late but I still wanted to share how I created this classic 4th of July cake. My neighbor and I had planned a 4th of July potluck cook out and I quickly told her I was going to make a FLAG CAKE. Had I ever made a flag cake before? Well, no....but I didn't let that stop me.

I knew I wanted this cake to be light and fresh. So, I decided on sponge cake, whipped cream and fresh berries. The sponge cake is actually Pioneer Woman's recipe for tres leches cake (minus the leches). It's a great recipe, though I did have some problems with it because of the baking time. When I first made this cake (for Cinco de Mayo), I used a smaller baking pan and adjusted the baking time accordingly. This time I used a 9 x13 pan (the size stated in PW's recipe) and baked for the recommend time 35 -45 min. When my timer went off after 35 minutes, I was disappointed to see that the cake had over baked and was half deflated. I had to make an entire new batch and start again. This time I removed the cake after only 22 minutes and it was perfect.


I used whipped cream because I love how that tastes with fresh berries. However, if you make this cake and plan to have it sit out for a bit definitely use some type of frosting that is more stable, such as a buttercream.

Also, try to use the same size strawberries. This will make the "stripes" on the cake look neater and give the cake an overall better appearance. You may also substitute raspberries for the strawberries and just do a double row of berries instead of a single.


Overall, I was very please with how this cake turned out and how it tasted. Everyone at the cookout seemed to really enjoy it too. HAPPY 4th of JULY!!!!


Ingredients:

FOR THE CAKE:
1 cup All-purpose Flour
1-½ teaspoon Baking Powder
¼ teaspoons Salt
5 whole Eggs
1 cup Sugar, Divided
1 teaspoon Vanilla
⅓ cups Milk

FOR THE ICING:
1 pint Heavy Whipping Cream
3 Tablespoons Sugar
1/2 teaspoon clear vanilla extract

FOR TOPPING:
Fresh blueberries, rinsed and patted dry
Strawberries, rinsed and patted dry. Cut off the stems and slice in half.

Directions:

Preheat oven to 350 degrees. Line the bottom of a 9 x 13 inch pan with parchment paper, then liberally spray with cooking spray until coated.
Combine flour, baking powder, and salt in a large bowl. Separate eggs.
Beat egg yolks with 3/4 cup sugar on high speed until yolks are pale yellow. Stir in milk and vanilla. Pour egg yolk mixture over the flour mixture and stir very gently until combined.
Beat egg whites on high speed until soft peaks form. With the mixer on, pour in remaining 1/4 cup sugar and beat until egg whites are stiff but not dry.
Fold egg white mixture into the batter very gently until just combined. Pour into prepared pan and spread to even out the surface.
Bake for 20 to 30 minutes or until a toothpick comes out clean. Turn cake out onto a large rectangular platter and allow to cool.

To make the whipped cream, chill mixing bowl and whisk attachment for 10 minutes in the freezer.
Add the heavy cream, sugar and vanilla. Beat on high till the cream makes stiff peaks. Reserve 1/3 of the whipped cream for piping.

Spread the remaining 2/3 of whipped cream over the surface of the cooled cake. Smooth the cream over the cake with an offset spatula. Then add the blueberries in neat rows to the upper left corner of the cake to make the "stars". To make the "stripes", line up neat horizontal rows of the strawberries.
Put reserved whipped cream into a pastry bag fitted with a large star tip. Pipe rows of cream in between strawberry rows and around border of cake. Keep cake refrigerated until ready to serve.

Source: cake inspiration adapted from Ina Graten, cake recipe adapted from Pioneer Woman