Thursday, March 25, 2010

Blueberry Muffins


The grocery store had really beautiful, plump blueberries on sale this week, so I bought 3 cartons. The kids and I both love blueberries, well berries of any sort really and these little beauties were gobbled up pretty quickly. I did however manage to save about one cup to use for baking.

I decided muffins would be good to make b/c the kids could have them for breakfast and for an after school snack. Plus, my daughter would think they were cupcakes (which she pronounces as "k-cups") and really love them. So, I started looking up recipes and ran across this one from FakeGinger (via Tastespotting *). I liked that these muffins were easy to make and that they yielded a small batch. I got 9 muffins out of this batter which was perfect for my small family.

In Amanda's post (FakeGinger), she said the muffins were a bit dense and thought that swapping out some of the all-purpose flour for cake flour might lighten them up a bit. I took her recoomendation and swapped out half a cup and this seemed to fix the problem. My muffins came out the perfect texture. They are light but substantial and not overly sweet. The crumb/struesal topping is great on these and I made half a batch with it and half with out. The recipe below, includes the changes that I made.

*You can check me out on Tastespotting by clicking HERE.

With and without crumb topping...yummy both ways.


Ingredients:

Blueberry Muffin
1 cup all-purpose flour
1/2 cup cake flour
3/4 cup white sugar
1/2 teaspoon salt
2 teaspoons baking powder
1/3 cup vegetable oil
1 egg
1/3 cup + 2 Tbsp. milk
1 cup fresh blueberries

Crumb Topping
1/2 cup white sugar
1/3 cup all-purpose flour
1/4 cup butter, cubed
1 1/2 teaspoons ground cinnamon


Preheat oven to 400 degrees F (200 degrees C). Grease muffin cups or line with muffin liners.

Combine all purpose and cake flour, sugar, salt and baking powder. In another bowl combine vegetable oil, egg and milk. Add oil mixture to the flour and stir till combined. Fold in blueberries. Fill muffin cups 2/3 of the way, and sprinkle with crumb topping mixture if using.

To Make Crumb Topping: Mix together 1/2 cup sugar, 1/3 cup flour, 1/4 cup butter, and 1 1/2 teaspoons cinnamon. Mix with fork, and sprinkle over muffins before baking.

Bake for 20 to 25 minutes in the preheated oven, or until done.

Source: Adapted from FakeGinger, originally from Allrecipes

Just a quick note...

I just wanted to post a quick message here for anyone who has emailed me recently but not received a reply back. I have been having some technical difficulties with my outgoing email an am still working to correct those. I'm hoping to get things up and running soon.

Thanks for understanding.

Maria

Tuesday, March 23, 2010

Sweet and Sour Chicken


I had this recipe from My Kitchen Cafe saved for a while and ended up making it last Friday. I was craving Chinese food but didn't really want to order take-out, so I decided to give this a shot.

The first thing I loved about this dish, is that it all of the ingredients are pantry staples (ketchup,soy sauce,vinegar). So, I didn't have to make a special trip to the store which is great. Secondly, this tastes FANTASTIC! Just like it came from our local Chinese restaurant, only better!

The one negative thing about this recipe, is that it is not exactly figure friendly thanks to all the sugar. So, if you are watching your weight, pay attention to your serving size and pair it with healthy sides like brown rice and steamed veggies. Definitely give this recipe a try though, you won't be disappointed.

My son and I loved this dinner. My daughter loved the chopsticks!


Ingredients

Chicken:
3-4 boneless, skinless chicken breasts
Salt and pepper
1 cup cornstarch
2 eggs, beaten
1/4 cup canola oil

Cut boneless chicken breasts into chunks. Season with salt and pepper. Dip chicken in cornstarch and then in egg. Fry in a little oil until brown but not cooked through. Place in a single layer in a baking dish. Mix sauce ingredients (below) together and pour over chicken.

Sauce:
¾ cup sugar
4 tablespoons ketchup
½ cup vinegar
1 tablespoon soy sauce
1 teaspoon garlic salt

Bake for one hour at 325 degrees. Turn chicken every 15 minutes. If you like extra sauce, make another batch of sauce and bring it to a boil on the stove top. Stir constantly and let cook over medium heat until thickened and reduced – about 6-8 minutes.

Source: My Kitchen Cafe

Saturday, March 20, 2010

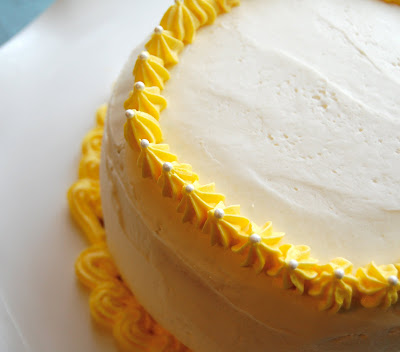
Belle mini-doll cake and lemon cake with raspberry filling


I made this mini Belle (from Beauty and the Beast) cake and the bottom lemon cake to celebrate my daughter's 2nd birthday (Wow! That happened in the blink of an eye!!).

I was pretty disappointed with how Belle looked though. Unfortunately, I didn't have the right piping tip for the skirt and had to make do with what I had. The bottom cake gave me some trouble too. I was rushing to get it done and made the mistake of trying to assemble the layers before the cakes had fully cooled. When I went to stack and ice the top layer, raspberry filling started oozing out everywhere! Luckily, I was able to salvage the cake with some creative icing but it also ended up a little lopsided in the process...oh well, lesson learned.

These were actually two completely separate cakes and I am listing the directions and recipe for each below. The Belle cake was just made from a boxed yellow cake baked in a sheet pan. The bottom cake was a homemade, Martha Stewart lemon cake with raspberry filling. Both of the cakes were iced with a traditional buttercream frosting.

Even though, I wasn't crazy how this cake looked it still got plenty of "oohs" and "ahhs" from the birthday girl. She recently discovered Disney princesses and loves Belle, "Ella", "Snow Y" and "A-L".


Belle cake

For directions on how to make this cake, please click HERE.

Lemon cake with raspberry filling


Lemon Cake
1 cup (2 sticks) unsalted butter, room temperature, plus more for pans
2 1/2 cups all-purpose flour (spooned and leveled), plus more for pans
1/2 teaspoon baking powder
1/2 teaspoon baking soda
1 teaspoon salt
1 tablespoon lemon zest
1 1/2 cups sugar
2 large eggs plus 3 large egg yolks
2 tablespoons fresh lemon juice
1 cup low-fat buttermilk

Preheat oven to 350 degrees. Butter and flour two 8-by-2-inch cake pans, tapping out excess flour. In a medium bowl, whisk flour, baking powder, baking soda, salt, and lemon zest.
In a large bowl, using an electric mixer, beat butter and 1 1/2 cups sugar until light and fluffy. With mixer on low, beat in eggs and yolks, one at a time. Beat in 2 tablespoons lemon juice. Alternately beat in flour mixture and buttermilk beginning and ending with flour mixture; mix just until combined.
Divide batter between pans; smooth tops. Bake until cakes pull away from sides of pans, 32 to 35 minutes. Let cool in pans 10 minutes. Run a knife around edges of pans and invert cakes onto a wire rack. Let cool completely.

Source: Martha Stweart

Raspberry Filling
Makes: about 2 cups of filling.

1 pkg (16 ounces) frozen raspberries packed in sugar thawed
1/3 cup granulated sugar
3 tablespoons cornstarch
1 teaspoon lemon juice

Drain raspberries, reserving liquid. Add enough water to liquid to equal 1 1/4 cups. In large saucepan, combine liquid, sugar, cornstarch and lemon juice; mix well. Heat and stir until mixture boils and thickens. Cool completely. Stir thawed raspberries into cooled mixture. Fill cake.

Source: Wilton's

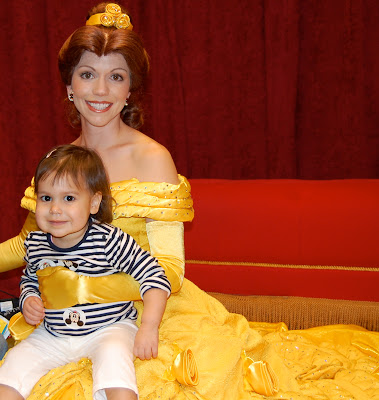
My little girl and the "real" Belle.

Wednesday, March 17, 2010

Creamy Broccoli Soup with Shamrock Crostini


Happy St. Patrick's Day!!

Here is a quick and fun soup that I just made for my family to eat later tonight. It's a light and healthy broccoli soup with cute, shamrock shaped* crostini that can be served on the side or on top of the soup itself. I know my son will love this b/c it's green and to him on St. Patty's day we MUST eat green food :)

It even looks elegant enough to be a grown up dish!

I love these cute crostinis!


Ingredients:
Creamy Broccoli Soup

1 tablespoon olive oil
1 medium onion, chopped
1 can (14 or 14.5 ounces) chicken broth
1 package (12 ounces) fresh chopped broccoli
1/2 cup water
1 large potato, peeled and cubed
1/4 teaspoon pepper
1/2 teaspoon salt
1/4 teaspoon thyme
Pinch nutmeg
1/2 cups milk

Directions
1. In large saucepan, heat oil over medium-high heat. Add onion and cook until golden, about 5 minutes. Stir in broth, broccoli, water, potato, pepper, salt, thyme, and nutmeg. Heat to boiling over high heat. Reduce heat to low, and simmer until potato is cooked, about 15 minutes. Cool 10 minutes.
2. Puree soup in blender until smooth then pour back into saucepan or puree in the pot with an immersion blender (my preferred method). Stir in milk, and warm soup over low heat. Season with additional salt and pepper if desired. Serve with crostini.

Source: Adapted from Parents.com

Shamrock Crostini

8 slices white bread
2 tablespoons butter or buttery spread, at room temperature
2 tablespoons fresh Parmesan cheese, finely grated

Directions:
1.Preheat oven to 425°F.
2.Using shamrock shaped cookie cutters cut out bread. Spread slices of bread with butter or buttery spread and sprinkle with a Parmesan cheese. Place on a baking sheet and bake until crisp, about 6-8 minutes.

*Shamrock cookie cutters can be found at stores like Michael's during early Spring.

Source: Adapted from tvDisney.com

Tuesday, March 16, 2010

Rainbow Cupcakes


Here are the "rainbow" cupcakes we made for my son's morning preschool class. Actually my son and our awesome babysitter,Tori, made the cake and I did the frosting and sprinkles later that night.

These cupcakes looked great and were a HUGE hit with all the kids! Many asked me for the directions of how to make them, so, I sent in printed instructions for everyone the next day.

They are super simple though and a fun cooking project to do with the kids. Basically, take white cake mix, divide it into a couple of batches and add food coloring to the batter. Then just spoon the colored batter into the cupcake liners, bake and voila! Easy peasy and so much fun!!!

Tori and my son working on the cupcakes. They did a great job!

What the batter looks like with color...the brighter the better.

It was cool how every cupcake looked a bit different.

The End :)


Ingredients
(makes 20-24 cupcakes)
1 box white cake mix
3 eggs
2 tbsp. vegetable oil
1 1/3 cup water
food coloring gel (any colors you like)
1 can of vanilla frosting or batch of homemade buttercream
sprinkles (optional)

1. Preheat oven to 350 degrees F. Line a muffin pan with 20-24 white paper liners. In a stand or hand electric mixer, beat the cake mix, eggs, oil and water according to package, until well combined.
2. Divide batter evenly between 5 white or glass bowls. Drop 5 different colors of food coloring into each cake batter bowl until you reach your desired colors. Stir well.
3. Spoon each color into paper lined cupcake tins until all are filled about 2/3 of the way.
4. Bake for 15-20 minutes or until cooked through. Remove and let cool completely.
5. Top with frosting of choice and add sprinkles if desired.

Source: Unknown

Thursday, March 11, 2010

Alligator Cupcake Cake


One of the primary reasons for our recent trip to Walt Disney World was to celebrate our son's 5th birthday. We didn't have a party at home for this reason but I knew that he still wanted to celebrate with his friends and teachers. I really wanted to make something special since to me, turning 5 is such big deal. Also, my son is just a really, really good kid who I love doing things like this for.

He actually picked out this alligator cupcake cake himself from the book Hello Cupcake! and I ended up making these for his PM preschool class. He actually goes to 2 preschools (a private, church preschool in the AM and a special ed. public school in the afternoons). We made rainbow cupcakes for the AM class that turned out really cute too. I'll post that recipe soon.

This cupcake cake might look complicated but it wasn't really that difficult. That's what I love about the Hello Cupcake book. It has so many amazing ideas that are totally doable!

Close-up!

You can see here one problem I had with these. I frosted the body of the alligator one day and finished the tail the next. However, the frosting color got more concentrated while refrigerated overnight...hence, the darker tail.

Where does the time go?....my son at about 5 months old... all chubby and cute!!

Today, a slimmed down, geography loving, animal expert, assistant chef,pop music fan, one man navigation system, too funny, sweet and smart 5 year old! Happy Birthday Peanut! I LOVE YOU!!!!


Ingredients:
18-24 vanilla or chocolate cupcakes in white paper liners
2 cans of white frosting or a large batch of homemade
green and yellow food coloring to make murky green color
1 bag square chocolate cookies
6 marshmallows
2 Junior mints *
12 banana shaped hard candies*
2 green jelly beans*

* These candies can easily be found in your local mall candy store.

You will need approximately 24 cupcakes but you can use more or less depending on how big you want the finished cupcake cake to be (I used 19). Make the body of the alligator two cupcakes wide with the tail and snout only one cupcake wide. One cupcake can be used for each of the four feet. Frost each cupcake with green frosting and use an open decorating tip to pipe scales onto each cupcake if you are so inclined. Banana shaped hard candies inserted into each foot create realistic looking claws while sharp teeth can be cut out of marshmallows or white taffy with scissors. The finishing touch is to connect two large marshmallows together with green frosting to create a cylinder. Frost the marshmallows with green frosting while leaving both ends un-frosted. Place these eyes on the head of the alligator and press a chocolate covered candy onto each end of the marshmallows to represent pupils.

Source: Hello Cupcake!

Wednesday, March 10, 2010

Garlic Shrimp in Coconut Milk, Tomatoes and Cilantro


Vacation eating is a lot like holiday eating too me. My family and I always end up over indulging on vacation. Our meals are typically bigger, more fattening and dessert is always included at the end.

The day we got back from our Disney trip, both my husband and I were craving something light and home cooked. I knew where to go to find it such a meal...Gina's WW blog! I had actually bookmarked this garlic shrimp dish before our trip and decided to give it a try that night. It turned out to be just what we were looking for...light and tasty! Plus, it was a quick meal to prepare and cook...perfect after a long day of flying with two kids.

Ingredients:
Servings: 4

1 1/4 lbs jumbo shrimp, peeled and deveined
1 tsp extra virgin olive oil
1 red bell pepper, sliced thin
4 scallions, thinly sliced, white and green parts separated
1/2 cup cilantro
4 cloves garlic, minced
kosher salt
1/2 tsp crushed red pepper flakes (to taste)
14.5 oz can diced tomatoes
14 oz can light coconut milk (50% less fat)*
1/2 lime, squeezed

In a medium pot, heat oil on low. Add red peppers and sauté until soft (about 4 minutes). Add scallion whites, 1/4 cup cilantro, red pepper flakes and garlic. Cook 1 minute.

Add tomatoes, coconut milk and salt to taste, cover and simmer on low about 10 minutes to let the flavors blend together and to thicken the sauce.

Add shrimp and cook 5 minutes. Add lime juice.

To serve, divide equally among 4 bowls and top with scallions and cilantro.

WW POINTS: 5.5 per serving

Source: Gina's Weight Watcher Recipes, originally adapted from Fine Cooking

Monday, March 8, 2010

WDW Resturant Review- Bongos Cuban Cafe (Downtown Disney)


(Pechuga de Pollo a la Plancha - grilled chicken breast marinated in garlic and lemon topped with grilled onions served with white rice and sweet plantains).

For our last day at WDW, we went to Downtown Disney and ate lunch at Bongos. We've eat at this Gloria Estefan owned, Cuban themed restaurant before and really enjoyed it. After almost a week of mostly burgers and fries it was nice to eat some authentic Cuban cuisine. In fact, my son actually said it was his favorite meal of the entire trip. Ha! simple grilled chicken with onions, rice and plantains was preferred over Kraft style mac n' cheese...I'm so proud :)

The restaurant is themed to evoke old world Havana in the 1940's and 50"s and I believe they play live Cuban music during dinner---I love dinner and a show! The restaurant also features a walk-up window and outdoor tables, which is great if you want a more casual lunch. Just order yourself a Cuban sandwich, sit back, soak up the Florida sun and enjoy....you're on vacation!!!

We also ordered Ropa Vieja , aka "Old Clothes". It's shredded beef in a light tomato sauce with onions and peppers...a classic Cuban dish.

Bongos Cuban Cafe in Downtown Disney.

My son playing the bongos outside of Bongos.

Friday, March 5, 2010

WDW Resturant Review- Beaches and Cream (Beach Club Resort)


(Classic burger and fries)

We love Beaches and Cream. It's one of the few places we try to go to every time we visit Disney. Beaches and Cream is an old fashioned soda shop at the Beach Club Resort. The food is classic American; burgers, fries,hot dogs, ice-cream and such. What they are most famous for though is an ice cream sundae called "The Kitchen Sink". It is basically a banana split on steroids and easily feeds 6 grown adults. It comes out in this giant kitchen sink shaped bowl and is such a crazy dessert, you can't help but smile.

Another reason why we like this place is that the Beach Club (and Yacht Club) is such a beautiful resort. We usually go for a walk around the boardwalk outside to work off some of the fries and ice cream. The grounds are so lovely and relaxing you really feel like you are on vacation there.

Silly kids...I hope they weren't calling Guam.

Strawberry shortcake.

They brought my son a b-day balloon and everyone sang happy birthday to him.

My son sharing his ice cream with his sister.

Thursday, March 4, 2010

WDW Resturant Review- Pizzafari (Animal Kingdom)


(Pizza, side salad and drink combo)

The menu selections are very limited at this Animal Kingdom counter service eatery. I had the pizza (shocker), salad and drink combo. It tasted pretty blah....but I kind of expected that from just the look of it. The salad was only romaine lettuce (no tomatoes, onions, cucumbers or even croutons!) with a Wish Bone type of dressing...pretty lame.

There was one thing I really liked about Pizzafari though....it had lots and lots of indoor seating! Which was perfect because the day we visited Animal Kingdom it was very cold and windy! Honestly, we were so happy to eat inside that day that we didn't care too much about our lunch at Pizzafari.

Here are some pictures from our fun (and cold) day at Animal Kingdom.


Wednesday, March 3, 2010

WDW Resturant Review- Cosmic Ray's Starlight Café (Magic Kingdom)


(Blast-off cheeseburger with eclipse chips)

Cosmic Ray's Starlight Cafe is a counter service eatery in the Tomorrowland section of Magic Kingdom. I had the "blast-off" cheeseburger and "eclipse" chips. The burger reminded me of something you would eat in a high school cafeteria. The chips were pretty good, though I'm sure super-unhealthy...but what the heck....it's vacation right.

My kids had the chicken nugget meals and they quickly gobbled those up. I was happy their meals also included fresh grapes and baby carrots. The fixings bar had a nice array of toppings and condiments. I don't have anything else exciting to say about Cosmic Ray's. This is a casual place for a quick lunch. Don't expect great food but it's not bad either.

Here are some pictures from our fun day at the Magic Kingdom.


Tuesday, March 2, 2010

WDW Resturant Reviews: Crystal Palace (Magic Kingdom)


I picked the Crystal Palace (located in the Magic Kingdom) to have my son's birthday dinner. Even though he was turning 5 and a bit past Pooh and pals, I knew he would still get a big kick out of seeing all the characters.

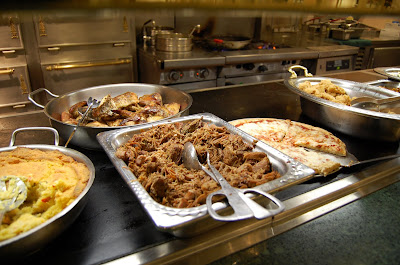
The Crystal Palace is a buffet style restaurant and even though I personally am not a huge fan of buffets, the kids love it! There was plenty of the traditional kid fare (mac n'cheese, chicken nuggets, pizza, meatballs, etc) but a lot of other choices as well (baked salmon, prime rib, array of salads and sides). We definitely got our money's worth that night... my son ate a TON!

I also ordered a small, six inch birthday cake (for an additional $22), so my son could blow out some candles. This was definitely pricey, especially since the cake tasted awful!! They had a good variety of desserts at the buffet that were much, much better...oh, well...live and learn.

The best thing about the Crystal Palace though is the interaction with the characters. Pooh Bear, Tigger, Piglet and Eeyore made their way to all the tables for a meet and greet session. They also did a "parade" through the restaurants that the kids could participate in. My kids were in heaven!!!

The buffet spread.....


Desserts


Kids and buffets go hand-in-hand. My son ate a TON!

My son's birthday cake....it tasted AWFUL but at least it had candles!!

The best part of Crystal Palace....Pooh, Tigger, Piglet and Eeyore.